Creating a Dropdown Navbar With Users and Avatars
This guide will use Devise, Paperclip, and Bootstrap to quickly implement a powerful navbar to allow users to create accounts, log in, log out, edit profiles, add avatars, all from an elegent drop down navbar. Similar to Github.
Devise is a great way to quickly setup user authentication quickly on your site. It provides the helper methods, views, routes, and controllers you will need for authentication.
Paperclip is an easy way to have users upload files. Perfect for user selected avatars.
Bootstrap is an extensive JS/CSS library to help make your webpage look great.
First Lets install the gems necesary to implement these features into your project. We install jquery-rails as well as it is a dependency of bootstrap. In your Gemfile add:
gem 'jquery-rails'
gem 'devise'
gem 'paperclip'
gem 'bootstrap'
In the terminal run:
bundle installThis installs the gems in our project and we are now ready to implement them.
Devise has a couple of powerful command lines to to easily implement it into your project. In the terminal run
rails generate devise:installThis installs devise into our project by creating a devise.rb file in initializers and a devise.en.yml in locales
Now we want to to add a model for devise to authenticate. Lets call that model user. In the terminal run:
rails generate devise userThis command generated a user.rb file in models, a migration file in db/migrate and a line in routes.rb for users views
Now that we have a user model and routes we can generate the views to login, logout, sign up etc. Run:
rails generate devise:viewsThis creates a devise folder in views with all the views built and ready to use!
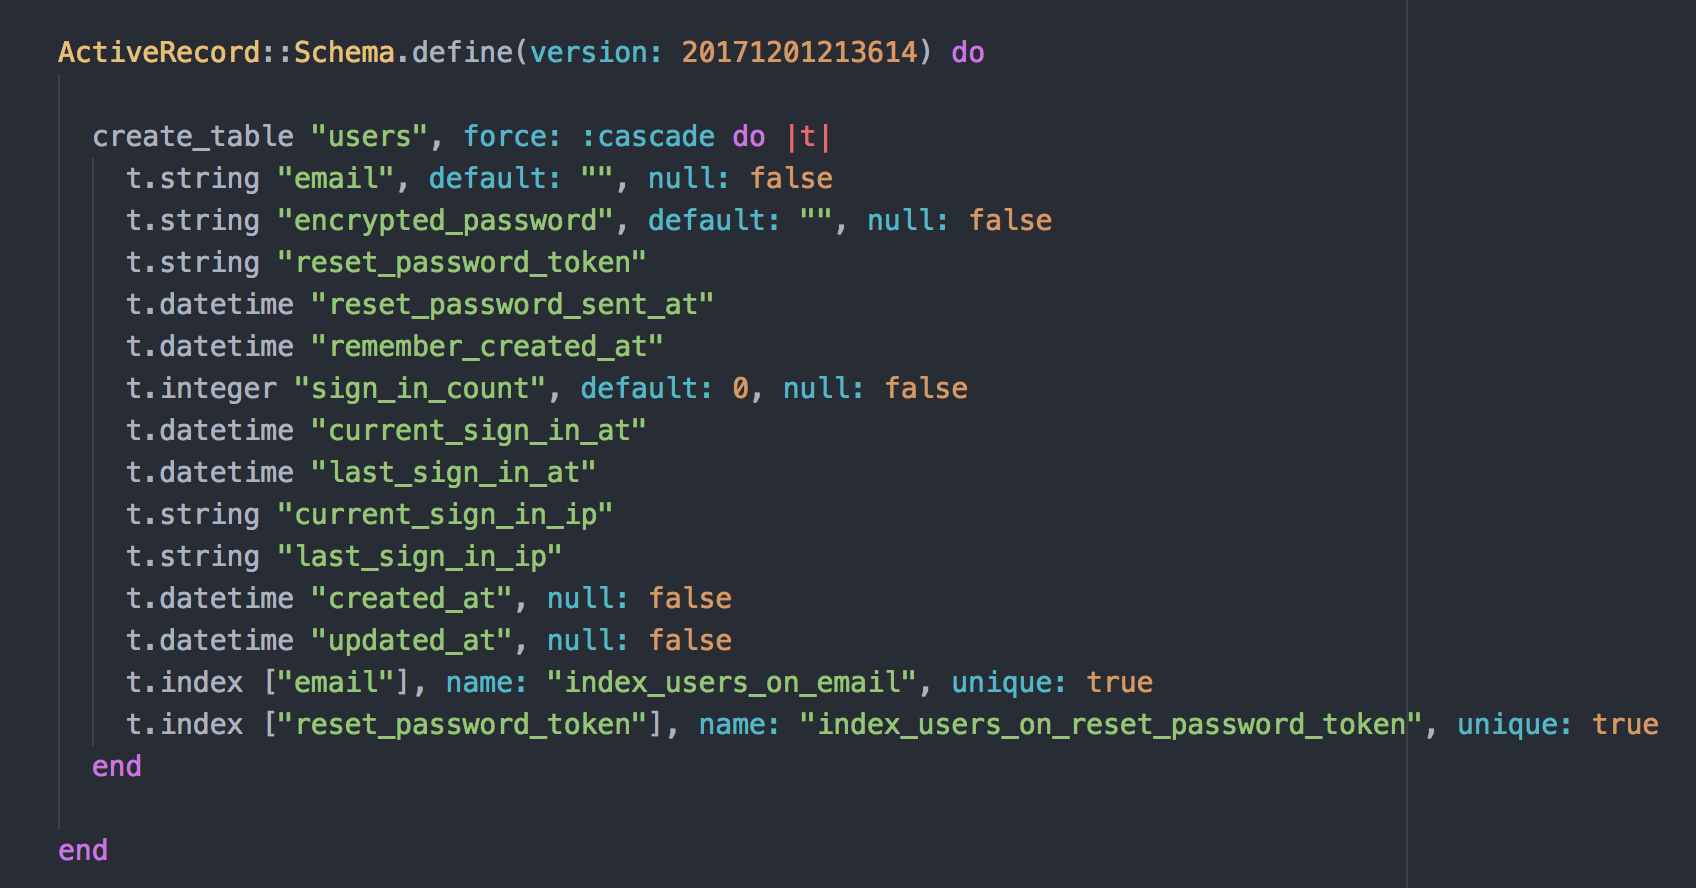
When we created the user model we also created a migration to store the user in our database. Let’s update our schema.
rails db:migrateIf this is for a new project you will need to run rails db:create before rails db:migrate
This creates a user Table in our schema.rb following the migrate file we created. And that is it! We can now successfully authenticate users!
If we run: rails s and serve out website we can sign in by going to localhost:3000/users/sign_in but that isn’t very practical. Lets make a navbar so that users can log in and out. In our app/views/layouts/application.hmtl.erb add this to the top of the body.
...
<nav class="navbar navbar-expand-lg navbar-light bg-light">
  <% if current_user %>
    <p> Welcome <%= current_user.email %>
    <a class="navbar-brand"><%= link_to 'Edit Profile',edit_user_registration_path %></a>
    <a class="navbar-brand  ml-auto"><%= link_to 'Logout', destroy_user_session_path, method: :delete %></a>
  <% else %>
    <a class="navbar-brand ml-auto"><%= link_to 'Login', new_user_session_path %></a>
  <% end %>
</nav>
...
This ensures that a navbar will be on all our pages above our content
Currently This navbar will not work as it uses bootstrap. While we installed the bootstrap gem we need to import it into our project. This can be done by going to app/assets/stylesheets/application.css. Rename the file from .css to .scss to make it a SASS stylesheet and add this line of code to the top.
@import "bootstrap";Because we are doing a dropdown navbar we will also some bootstrap javascript features and need to change our app/assets/javascripts/aplication.js by adding the following lines of code.
//= require jquery3
//= require popper
//= require bootstrap
Now a user can quickly log in and out using the navbar. But its a bit odd to welcome a user by their email. It would be better to use a username. Looking at the schema.rb built by Devise there is no column to store a username in our database.
We will have to do that ourselves through a migration, in the terminal run:
rails g migration add_username_columnopen the file created in the db/migrate folder and add these lines of code inside of def change.
...
  add_column :users, :username, :string
  add_index :users, :username, unique: true
...
Then run rails db:migrate again. This creates a column in user that stores username as a string, along with index that requires username to be unique so there are no duplicates.
Now that we can store username in our users table we now need to change the views so that a user can input their username. Before we start changing the pre made devise views we need to allow custom views in our config/initializers/devise.rb file. Find this line and uncomment it.
# config.scoped_views = falseAnd Change it to
config.scoped_views = trueGreat now we can add a username input to our views. Open app/views/devise/registrations/new.html.erb and edit.html.erb. Right above the field for email add this code for a username field.
  <div class="field">
    <%= f.label :username %><br />
    <%= f.text_field :username, autofocus: true %>
  </div>
Great now users can sign up with a username! But wait they can input the username but it isn’t being saved. This is because of how rails deals with security issues. Each controller must explicitly say what params it will accept. Open the file app/controllers/application_controller.rb and add this below protect_from_forgery.
...
before_action :configure_permitted_parameters, if: :devise_controller?

protected
def configure_permitted_parameters
    devise_parameter_sanitizer.permit(:sign_up, keys: [:username, :email, :password])
    devise_parameter_sanitizer.permit(:account_update, keys: [:username, :email, :password, :current_password])
end
...
This explicitly lists the parameters that devise will allow.
Side note: you might be wondering to yourself if every controller must explicitly allow params why are we modifying our application controller instead of a devise controller. This is because we do not have access to the devise_controller as there isn’t one in our controllers folder. This controller is in the devise gem but if you read this line again, before_action :configure_permitted_parameters, if: :devise_controller it makes sense that when we are calling the devise controller in our application controller we set the permitted parameters for the devise controller.
Now we can save username! Lets display that on our navbar changing from email to username
...
    <p> Welcome <%= current_user.username %>
...
So now We have successfully implemented devise and customized it for username. Lets customize user again with an avatar that will display in our navbar.
We have already installed paperclip for uploading the image but we will also need imagemagick to process the image. In the console type:
brew install imagemagickJust like with username we will add avatar to users with a migration:
rails generate migration add_avatars_to_usersIn our created migration file inside of class AddAvatarsToUsers add these lines.
...
  def self.up
    change_table :users do |t|
      t.attachment :avatar
    end
  end

  def self.down
    drop_attached_file :users, :avatar
  end
...
Again we migrate to update the schema.
rake db:migrateThe commands in that migration are not as strait forward as the last so lets look at the schema.rb that was built after we migrated and see what changes happened to our users tables.
 As you can see four lines of code were added to store the avatar data.
Now we need to update our User model with the following code.
...
  has_attached_file :avatar, :styles => { :medium => "300x300>", :thumb => "100x100#" }, :default_url => "/images/:style/default.png"
  validates_attachment_content_type :avatar, :content_type => /\Aimage\/.*\Z/
...
This attaches the uploaded file to our user model with multiple sizes that are created with imagemagick and a default avatar is given on creation. Using regex /\Aimage\/.*\Z/ allows for multiple file types.
Again in order to use the avatar params we must permit it in the application_controller.rb just like username, lets add :avatar to those params.
class ApplicationController < ActionController::Base
    protect_from_forgery with: :exception

    before_action :configure_permitted_parameters, if: :devise_controller

    protected
    def configure_permitted_parameters
        devise_parameter_sanitizer.permit(:sign_up, keys: [:username, :email, :password, :avatar])
        devise_parameter_sanitizer.permit(:account_update, keys: [:username, :email, :password, :current_password, :avatar])
    end
end
Now we add the form input for avatar in the views like we did for username. Since users are created with a default avatar we should only change the edit view so that a user can change their avatar from the default. In devise/registrations/edit.html.erb add this code about the username field.
<%= image_tag(current_user.avatar.url(:thumb)) %>
  <div class="field">
    <%= f.label :avatar  %><br />
    <%= f.file_field :avatar %>
  </div>
This displays their current avatar which starts as the default.png that we set in the users model with this line of code :default_url => "/images/:style/default.png". We made two styles medium and thumb so we need to save two files in public/images/medium/default.png and public/images/thumb/default.png. I used these two.


Now we have everything we need to make our dropdown navbar down similar to Github. Lets go to our application.html.erb and change the navbar to this:
<nav class="navbar navbar-dark bg-dark">
      <% if current_user %>
        <div class="nav-item dropdown ml-auto mr-3">
          <a class="nav-link dropdown-toggle" href="#" id="navbarDropdownMenuLink" data-toggle="dropdown" aria-haspopup="true" aria-expanded="false">
            <%= image_tag(current_user.avatar.url(:thumb), :class => "round-image-50") %>
          </a>
          <div class="dropdown-menu dropdown-menu-sw" aria-labelledby="navbarDropdownMenuLink">
            <p class="custom">Signed in as <%= current_user.username %></p>
            <div class="dropdown-divider"></div>
            <%= link_to 'Edit Profile',edit_user_registration_path, :class => "dropdown-item" %>
            <%= link_to 'Logout', destroy_user_session_path, :class => "dropdown-item", method: :delete %>
          </div>
      <% else %>
        <a class="navbar-brand ml-auto"><%= link_to 'Login', new_user_session_path %></a>
      <% end %>
      </div>
    </nav>
Now we have a clickable avatar in our navbar that users can see their username, edit profile and log out! But the avatar is a bit large and the styling for Signed in as needs a little padding. Lets change our aplication.scss file to make it look better:
.round-image-50 {
    background-color: white;
    border: 1px solid #d9d9d9;
    border-radius: 25px;
    -moz-border-radius: 25px;
    -webkit-border-radius: 25px;
    height: 40px;
    width: 40px;
    overflow: hidden;
    text-align: center;
    img { width: 100% }
}
.custom{
  margin-right: 24px;
  margin-left: 24px;
}
.dropdown-menu-sw {
  right: 0;
  left: auto;
}
.navbar {
  padding-top: 0;
  padding-bottom: 0;
}
And we are finished! We now have a professional looking easy to navigate webpage for users!
The Complete Repo for this project can be found at: Dropdown Navbar Template